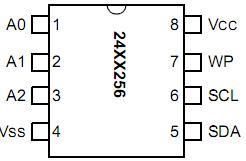
In this example we’ll be using the Microchip 24LC256 EEPROM, this chip when connected to an Arduino can increase the available memory space by 32kbytes. Here is a pinout of the IC
The address pins, A0, A1, and A2, which are pins 1, 2, and 3 are all connected to ground. Because of this they are all in LOW states (0v). This means that the address pins will have a value of 000 and the I2C address will be 0x50
The SDA pin, pin 5, of the EEPROM connects to analog pin 4 on the arduino.
The SCL pin, pin 6, of the EEPROM connects to analog pin 5 on the arduino.
The WP pin is the Write Protect pin, you could use this if you connected it to an Arduino output to prevent writing to an EEPROM if it was in a HIGH state (5v) but we will tie this to 0v
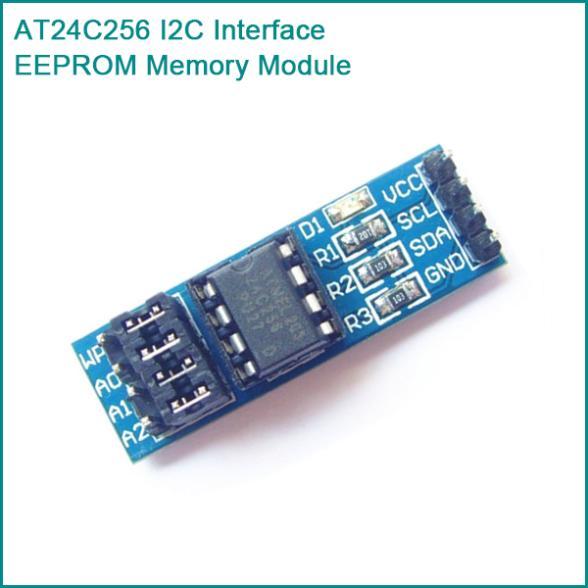
I bought the following module which had jumpers to set the I2C address and WP lines. it also has pull ups on the I2C lines on board
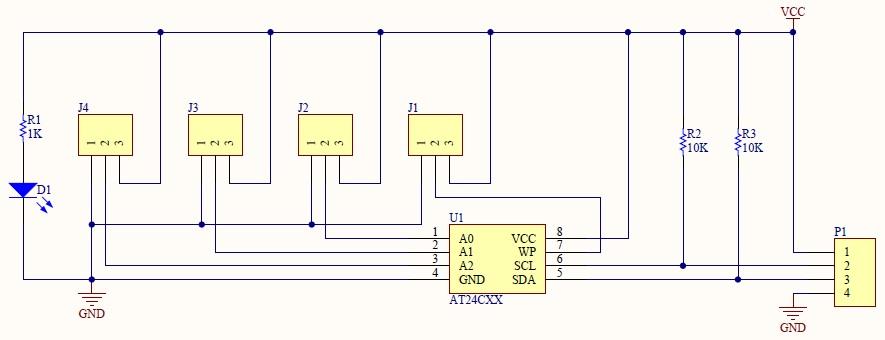
Of course a schematic is always useful to look at, just in case you want build one of these. The IC is an 8 pin DIP so its quite an easy little circuit to build on a breadboard or stripboard, you can use larger sized EEPROMs as well
Lets look at a simple code example which will write some data out and read it back in again, you can see some debug in the serial monitor
Code
The code below is for newer Arduino IDE versions as it uses Wire.receive to Wire.read , if you are still using a pre 1.0 version you need to change the code below to use Wire.send to Wire.write instead
[codesyntax lang=”cpp”]
#include <Wire.h>     // for I2C

#define eeprom_address 0x50    // device address
byte d=0;

void setup()
{
  Serial.begin(115200); // Initialize the serial
  Wire.begin();

  //write data out
  Serial.println("Writing data.");
  for (int i=0; i<10; i++)
  {
    writeData(i,i);
  }
  Serial.println("Complete");
  //read data back
  Serial.println("Reading data.");
  for (int i=0; i<10; i++)
  {
    Serial.print(i);
    Serial.print(" : ");
    d=readData(i);
    Serial.println(d, DEC);
  }
  Serial.println("Complete");

}

// writes a byte of data in memory location eaddress
void writeData(unsigned int eaddress, byte data)
{
  Wire.beginTransmission(eeprom_address);
  // set the pointer position
  Wire.write((int)(eaddress >> 8));
  Wire.write((int)(eaddress & 0xFF));
  Wire.write(data);
  Wire.endTransmission();
  delay(10);
}

// reads a byte of data from memory location eaddress
byte readData(unsigned int eaddress)
{
  byte result;
  Wire.beginTransmission(eeprom_address);
  // set the pointer position
  Wire.write((int)(eaddress >> 8));
  Wire.write((int)(eaddress & 0xFF));
  Wire.endTransmission();
  Wire.requestFrom(eeprom_address,1); // get the byte of data
  result = Wire.read();
  return result;
}

void loop()
{
}
[/codesyntax]
You should see something like
[codesyntax lang=”dos”]
Writing data.
Complete
Reading data.
0 : 0
1 : 1
2 : 2
3 : 3
4 : 4
5 : 5
6 : 6
7 : 7
8 : 8
9 : 9
Complete
[/codesyntax]
Links
The IC comes in at about $0.65 a piece and the module is under $2
20PCS 24LC256 24LC256-I/P DIP
AT24C256 I2C Interface EEPROM Memory Module


