Sometimes in your projects you simply do not have enough I/O lines available, take for example a lot of the multiple LED examples, these use 8 outputs to control 8 LEDs via your Arduino UNO, that can restrict the amount of outputs you would have available to drive other devices. Instead of this we can use a shift register, in this case a 74HC595 and using 3 I/O pins we can control 8 LED’s, thats a saving of 5 I/O pins for other uses.
You can use it to control 8 outputs at a time while only taking up a few pins on your microcontroller. You can link multiple registers together to extend your output even more. The 74HC595 has an 8 bit storage register and an 8 bit shift register. Data is written to the shift register serially, then latched onto the storage register. The storage register then controls 8 output lines
Lets look at the 74HC595
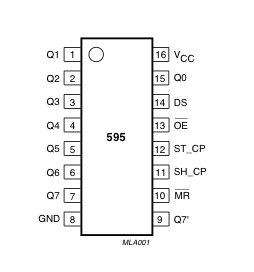
595 pin diagram
| PINS 1-7, 15 | Q0 to Q7 | Output Pins |
| PIN 8 | GND | Ground, Vss |
| PIN 9 | Q7″ | Serial Out |
| PIN 10 | MR | Master Reclear, active low |
| PIN 11 | SH_CP | Shift register clock pin |
| PIN 12 | ST_CP | Storage register clock pin (latch pin) |
| PIN 13 | OE | Output enable, active low |
| PIN 14 | DS | Serial data input |
| PIN 16 | Vcc | Positive supply voltage usually 5v |
This is a link to the 74HC595 datasheet
Schematic
This is the schematic on how to control the 74HC595 from your Arduino and how to wire up 8 sets of LEDs to the 74HC595.
- DS (pin 14) to Arduino DigitalPin 4 (yellow wire)
- SH_CP (pin 11) to to Arduino DigitalPin 6 (purple wire)
- ST_CP (pin 12) to Arduino DigitalPin 5 (orange wire)
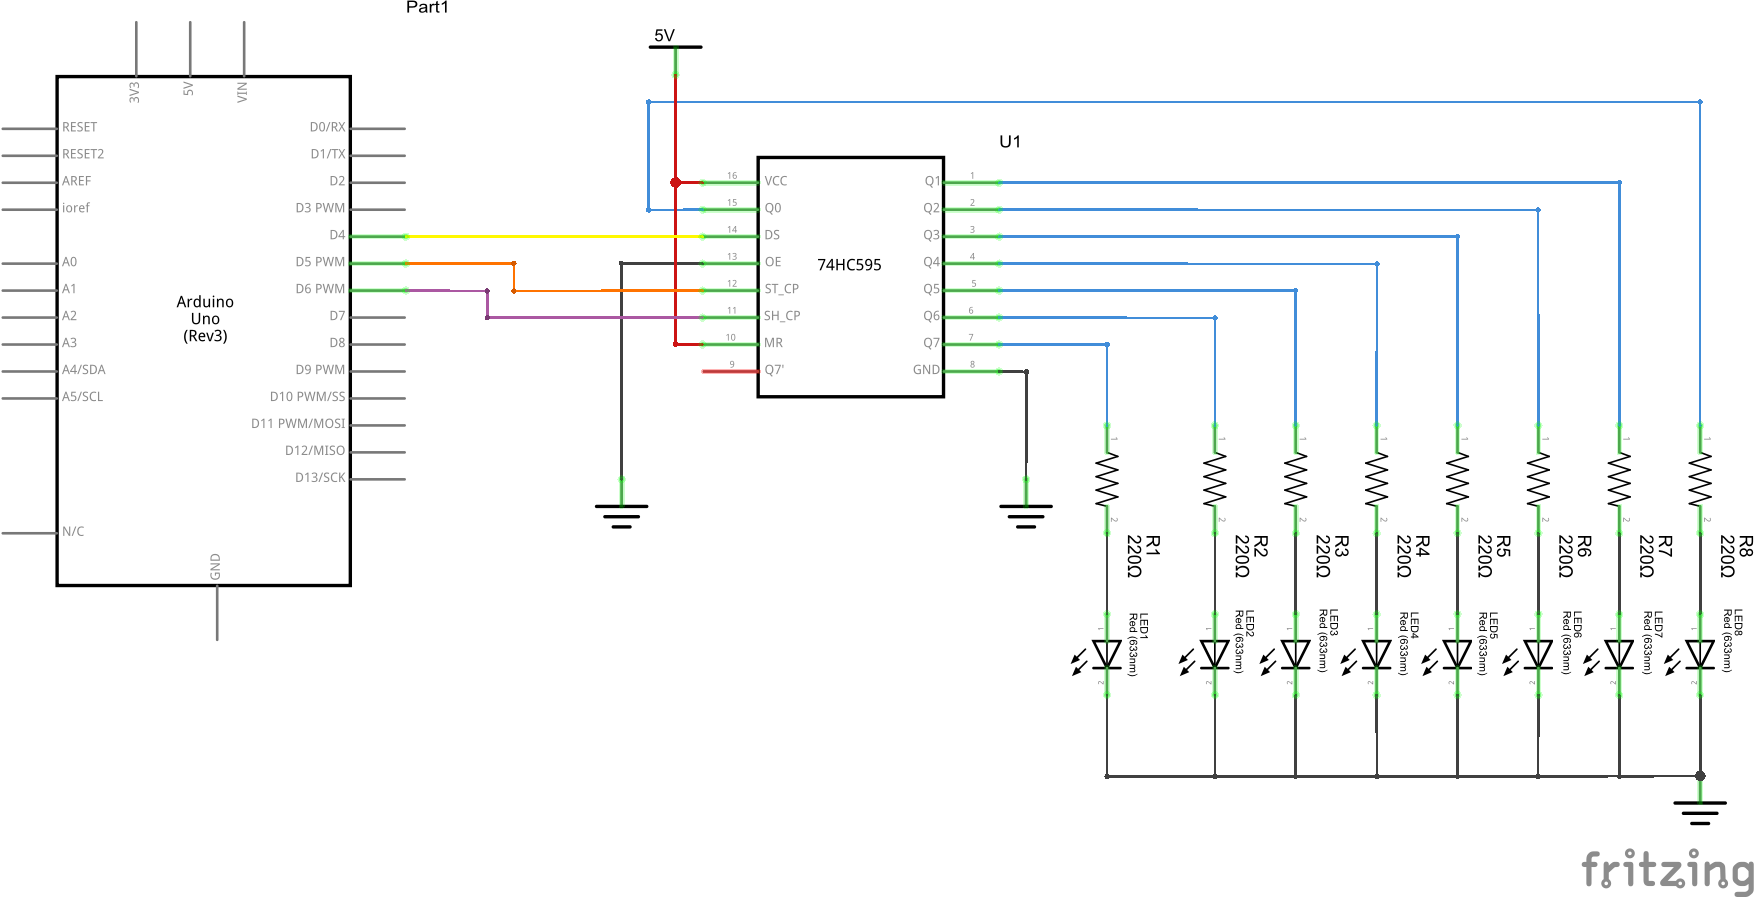
595 shift register schematic
Code
In this example we will simply display a random value on the LEDs, this will also show how to generate a random number.
[c]
int latchPin = 5;
int clockPin = 6;
int dataPin = 4;
long randNumber;
void setup() {
//set pins to output so you can control the shift register
pinMode(latchPin, OUTPUT);
pinMode(clockPin, OUTPUT);
pinMode(dataPin, OUTPUT);
randomSeed(analogRead(0));
}
void loop()
{
randNumber = random(1, 255);
// take the latchPin low so
// the LEDs don’t change while you’re sending in bits:
digitalWrite(latchPin, LOW);
// shift out the bits:
shiftOut(dataPin, clockPin, MSBFIRST, randNumber);
//take the latch pin high so the LEDs will light up:
digitalWrite(latchPin, HIGH);
// pause before next value:
delay(500);
}
[/c]
Links
10PCS SN74HC595N
30pcs SN74HC595N 8 Bit Shift Register
