5.3K
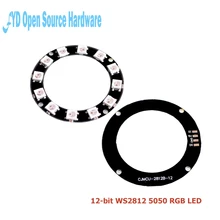
This was a WS2812b led ring that I purchased for low cost. There are 12 LEDs in total on this and once you solder 3 cables to the module you are ready to go
Connect Vcc to Arduino 5 volts, Gnd to Gnd and the In to D2, you can change this to any pin but you will need to change the code below
In the code example below we will display red, green and blue on all the LEDs
Code
You will need the Adafruit Neopixel library installed for this example
[codesyntax lang=”cpp”]
#include <Adafruit_NeoPixel.h>

#define PIN            2

// How many NeoPixels are attached to the Arduino?
#define NUMPIXELS      12

Adafruit_NeoPixel pixels = Adafruit_NeoPixel(NUMPIXELS, PIN, NEO_GRB + NEO_KHZ800);

int delayval = 250; // delay for half a second

void setup()
{
  pixels.begin(); // This initializes the NeoPixel library.
}

void loop()
{
  for(int i=0;i<NUMPIXELS;i++)
  {
    // pixels.Color takes RGB values, from 0,0,0 up to 255,255,255
    pixels.setPixelColor(i, pixels.Color(255,0,0)); // Moderately bright green color.
    pixels.show(); // This sends the updated pixel color to the hardware.
    delay(delayval); // Delay for a period of time (in milliseconds).
  }

  for(int i=0;i<NUMPIXELS;i++)
  {
    // pixels.Color takes RGB values, from 0,0,0 up to 255,255,255
    pixels.setPixelColor(i, pixels.Color(0,255,0)); // Moderately bright green color.
    pixels.show(); // This sends the updated pixel color to the hardware.
    delay(delayval); // Delay for a period of time (in milliseconds).
  }

  for(int i=0;i<NUMPIXELS;i++)
  {
    // pixels.Color takes RGB values, from 0,0,0 up to 255,255,255
    pixels.setPixelColor(i, pixels.Color(0,0,255)); // Moderately bright green color.
    pixels.show(); // This sends the updated pixel color to the hardware.
    delay(delayval); // Delay for a period of time (in milliseconds).
  }
}
[/codesyntax]
Link
Only $1.30 for this board
1pcs 12-bit WS2812 5050 RGB LED intelligent full-color RGB ring development board ring


