In this article we connect a TLV493D magnetic sensor to an Arduino Uno – other arduino boards should be Ok as well
Sensor Information
The 3D magnetic sensor TLV493D offers accurate three-dimensional sensing with extremely low power consumption in a small 6-pin package.
With its magnetic field detection in x, y, and z-direction the sensor reliably measures three dimensional, linear and rotation movements.
Applications include joysticks, control elements (white goods, multifunction knops), or electric meters (anti tampering) and any other application that requires accurate angular measurements or low power consumptions.
Features
• 3D magnetic sensing
• Very low power consumption = 10 µA during operations (10 Hz, typ.)
• Power down mode with 7 nA power consumption
• Digital output via 2-wire based standard I2C interface up to 1 MBit/sec
• 12-bit data resolution for each measurement direction
• Bx, By and Bz linear field measurement up to +130 mT
• Excellent matching of X/Y measurement for accurate angle sensing
• Variable update frequencies and power modes (configurable during operation)
• Supply voltage range = 2.8 V…3.5 V, Temperature range Tj = -40°C…125°C
• Triggering by external µC possible
• Interrupt signal available to wake up a microcontroller
• Temperature measurement
This is the sensor that I bought
Parts Required
The sensor you can pick up in the $6 price range – you can connect to the sensor using a standard header the classic dupont style jumper wire.
I used a Qwiic cable with dupont connector on the end – since a few sensors seem to use these but this is optional you can easily solder a header and connect
| Name | Link |
| Arduino Uno | UNO R3 CH340G with usb cable |
| TLV493D | ADA Adafruit (PID 4366) TLV493D Triple-Axis Magnetometer – Stemma QT/Qwiic |
| Connecting cables | Male to Male + Male to Female and Female to Female Jumper Wire Dupont Cable |
Schematic/Connection
I used the Adafruit TLV493D sensor and in this case used the Stemma connection
For the STEMMA QT cables, it uses the Qwiic convention:
Black for GND
Red for V+
Blue for SDA
Yellow for SCL
So color coded for ease of use, this layout shows a connection to the module
I also used 3.3v from the board, although you can quite easily use 5v, if you are using the header then connect to the pin marked Vin – the 3Vo pin is the 3.3V output from the voltage regulator on the sensor.
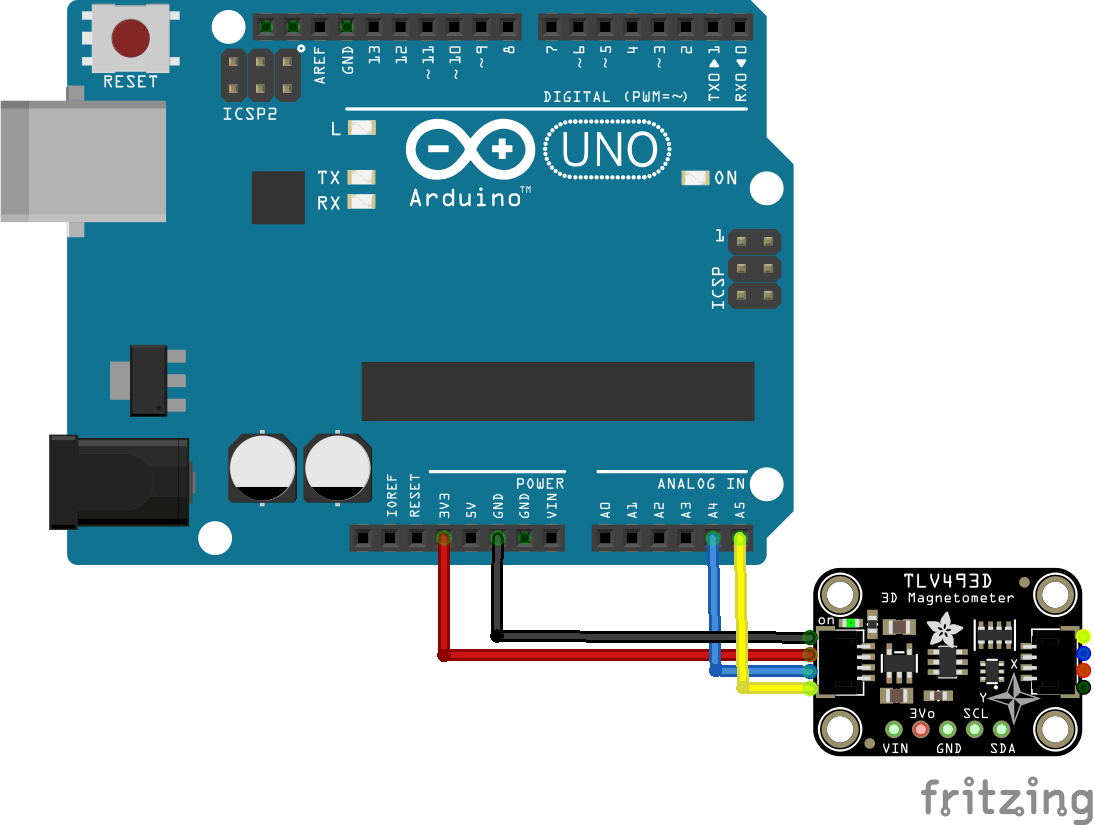
Arduino Uno and TLV493D layout
Code Example
This uses a library from Infineon installed using the Library Manager in the Arduino IDE. search for TLV493, and select the TLV493D-A1B6 library
This is the cartesian example which reads the X, Y, and Z axis measurements in milli-teslas (mT), there are a few examples to investigate that come with the library
[codesyntax lang=”cpp”]
#include <Tlv493d.h>

// Tlv493d Opject
Tlv493d Tlv493dMagnetic3DSensor = Tlv493d();

void setup() {
  Serial.begin(9600);
  while(!Serial);
  Tlv493dMagnetic3DSensor.begin();
}

void loop() {
  Tlv493dMagnetic3DSensor.updateData();
  delay(100);

  Serial.print("X = ");
  Serial.print(Tlv493dMagnetic3DSensor.getX());
  Serial.print(" mT; Y = ");
  Serial.print(Tlv493dMagnetic3DSensor.getY());
  Serial.print(" mT; Z = ");
  Serial.print(Tlv493dMagnetic3DSensor.getZ());
  Serial.println(" mT");

  delay(500);
}
[/codesyntax]
Output
Here is an example of what I saw in the serial monitor window – you may see some different results
X = 0.10 mT; Y = 0.10 mT; Z = 0.00 mT
X = 0.00 mT; Y = 0.20 mT; Z = 0.00 mT
X = -0.10 mT; Y = 0.10 mT; Z = 0.00 mT
X = 0.10 mT; Y = 0.20 mT; Z = -0.10 mT
Links
