This is a follow up to the Arduino and PySerial example. This time we will build a GUI with some buttons to switch the LED on and off.
There are 2 parts to this example, the arduino code and the python code. Lets start with the Arduino code and test it out.
Arduino
There is an easy to use example that you can find by navigating to the PhysicalPixel sketch which can be found in the Arduino IDE under File –> Examples –> 04.Communication –> PhysicalPixel
Here is the code with a lot of the comments and commented out processing code.
Looking at it you can see that we are opening a serial connection and reading in data, the key is whether the serial input is H or L.
Looking at the code below you can see that H will turn on the LED and L will turn the LED off
[codesyntax lang=”python”]
const int ledPin = 13; // the pin that the LED is attached to
int incomingByte;      // a variable to read incoming serial data into

void setup() {
  // initialize serial communication:
  Serial.begin(9600);
  // initialize the LED pin as an output:
  pinMode(ledPin, OUTPUT);
}

void loop() {
  // see if there's incoming serial data:
  if (Serial.available() > 0) {
    // read the oldest byte in the serial buffer:
    incomingByte = Serial.read();
    // if it's a capital H (ASCII 72), turn on the LED:
    if (incomingByte == 'H') {
      digitalWrite(ledPin, HIGH);
    }
    // if it's an L (ASCII 76) turn off the LED:
    if (incomingByte == 'L') {
      digitalWrite(ledPin, LOW);
    }
  }
}
[/codesyntax]
Python
I’ll assume you have installed Python, if not visit https://www.python.org/downloads/ and pick the version and OS you want and install it. I have various versions and the installation has always worked on Windows anyway.
Next you need to install PySerial, you can get this from https://pypi.org/project/pyserial/
The easiest way is to open a command line and type pip install pyserial
All going well this should download and install the correct files for you.
This time we will create a tkinter based GUI application, here is the complete code example
[codesyntax lang=”python”]
import serial
import time
import tkinter


def quit_button():
    global tkTop
    ser.write(bytes('L', 'UTF-8'))
    tkTop.destroy()

def on_button():
        varLabel.set("LED ON ")
        ser.write(bytes('H', 'UTF-8'))

def off_button():
        varLabel.set("LED OFF")
        ser.write(bytes('L', 'UTF-8'))

#change the COM port below
ser = serial.Serial('COM5', 9600)
print("Reset Arduino")
time.sleep(2)
ser.write(bytes('L', 'UTF-8'))

tkTop = tkinter.Tk()
tkTop.geometry('300x300') #300 x 300 window
tkTop.title("LED control") #name in title bar

#label to display the status
varLabel = tkinter.IntVar()
tkLabel = tkinter.Label(textvariable=varLabel, )
varLabel.set("LED STATUS")
tkLabel.pack()

#button1 - ON
button1 = tkinter.IntVar()
button1state = tkinter.Button(tkTop,
    text="ON",
    command=on_button,
    height = 4,
    width = 8,
)
button1state.pack(side='top', ipadx=10, padx=10, pady=15)

#button2 - OFF
button2 = tkinter.IntVar()
button2state = tkinter.Button(tkTop,
    text="OFF",
	command=off_button,
    height = 4,
    width = 8,
)
button2state.pack(side='top', ipadx=10, padx=10, pady=15)

#Quit button
tkButtonQuit = tkinter.Button(
    tkTop,
    text="Quit",
    command=quit_button,
    height = 4,
    width = 8,
)

tkButtonQuit.pack(side='top', ipadx=10, padx=10, pady=15)
tkinter.mainloop()
[/codesyntax]
Code explanation
You need the required imports, one of these is used for PySerial, the time is for a delay and the tkinter is for the GUI.
import serial
import time
import tkinter
The first block to look at opens the serial port, in this example for COM5 and baud rate 9600. You may have to change the serial port depending on your device
We delay for 2 seconds for the Arduino to reset and then we send an L to switch the LED off
ser = serial.Serial('COM5', 9600)
print("Reset Arduino")
time.sleep(2)
ser.write(bytes('L', 'UTF-8'))
Now we will look at one of the buttons and its callback which runs a function
This creates a button with text called ON and importantly calls the on_button function.
#button1 - ON
button1 = tkinter.IntVar()
button1state = tkinter.Button(tkTop,
  text="ON",
  command=on_button,
  height = 4,
  width = 8,
)
button1state.pack(side='top', ipadx=10, padx=10, pady=15)
This is the code for the on_button function which sets the label to LED on and sends H via the serial port to the arduino
def on_button():
  varLabel.set("LED ON ")
  ser.write(bytes('H', 'UTF-8'))
Running
I called this ledonoffgui1.py, now you can run this at the command line by typing in python ledonoffgui1.py
You should see something like this
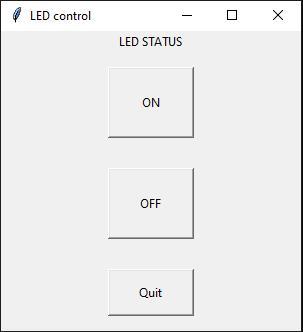
led control gui
Click on the buttons and test it out
