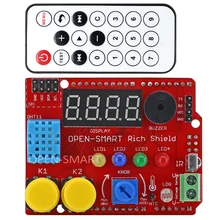
This Rich Shield for the Arduino has many useful components onboard such as LED’s, buttons and a buzzer. It is easy and great for learning arduino development and programming
This is the shield with a little remote control, we will show you an example to control the 4 LEDs the remote control
Parts List
You can get both of the required parts for about $12
| Name | Link |
| Arduino Uno | UNO R3 CH340G/ATmega328P, compatible for Arduino UNO |
| Rich Shield for Arduino | Rich Shield + IR Remote with Infrared Receiver LED Buzzer Button Light Sensor Temperature Sensor 24C02 EEPROM for Arduino UNO R3 |
Test Code
In this step we need to find the code that is associated with each key we wish to use, there are 4 LEDs on the board and we will use 4 buttons to switch an LED on and another 4 to switch the LEDs off, so in this example 8 buttons in total
You will need to download the library and add the zip file using the library manager
Click here to download the IRremote library
[codesyntax lang=”cpp”]
#include <IRremote.h>

int RECV_PIN = 2;

IRrecv irrecv(RECV_PIN);

decode_results results;

void setup()
{
  Serial.begin(9600);
  irrecv.enableIRIn(); // Start the receiver
  Serial.println("Serial results");
}

void loop()
{
  if (irrecv.decode(&results))
  {
    Serial.println(results.value, HEX);
    irrecv.resume(); // Receive the next value
  }
  delay(100);
}
[/codesyntax]
You should see something like this, I have added the corresponding button as well
FF30CF – 1
FF18E7 – 2
FF7A85 – 3
FF10EF – 4
FF38C7 – 5
FF5AA5 – 6
FF42BD – 7
FF4AB5 – 8
FF52AD – 9
FF6897 – 0
In our example we used the windows calculator to convert from hex to decimal values, we could have done this in the code.
Complete Example
Now we need to implement the complete example
[codesyntax lang=”cpp”]
/*
My remote values
FF30CF - 1
FF18E7 - 2
FF7A85 - 3
FF10EF - 4
FF38C7 - 5
FF5AA5 - 6
FF42BD - 7
FF4AB5 - 8
FF52AD - 9
FF6897 - 0
I convert these to decimal
*/
#include <IRremote.h>

int IR_Recv = 2;   //IR Receiver Pin 2
int redPin = 4;
int greenPin = 5;
int bluePin = 6;
int yellowPin = 7;

IRrecv irrecv(IR_Recv);
decode_results results;

void setup()
{
  Serial.begin(9600);
  irrecv.enableIRIn(); // Starts the receiver
  pinMode(bluePin, OUTPUT);
  pinMode(greenPin, OUTPUT);
  pinMode(yellowPin, OUTPUT);
  pinMode(redPin, OUTPUT);
}

void loop()
{
  //decodes the infrared input
  if (irrecv.decode(&results))
  {
    long int decCode = results.value;
    Serial.println(results.value);
    //switch case to use the selected button
    switch (results.value)
    {
      case 16724175: //when you press 1
        digitalWrite(yellowPin, HIGH);
        break;
      case 16726215: //when you press 5
        digitalWrite(yellowPin, LOW);
        break;
       case 16718055: //when you press 2
        digitalWrite(bluePin, HIGH);
        break;
       case 16734885: //when you press 6
        digitalWrite(bluePin, LOW);
        break;
       case 16743045: //when you press 3
        digitalWrite(greenPin, HIGH);
        break;
       case 16728765: //when you press 7
        digitalWrite(greenPin, LOW);
        break;
     case 16716015: //when you press 4
        digitalWrite(redPin, HIGH);
        break;
     case 16730805: //when you press 8
        digitalWrite(redPin, LOW);
        break;
    }
    irrecv.resume();
  }
  delay(10);
}
[/codesyntax]
Exercise(s)
Implement a button to switch on all LEDs and to switch off all LEDs
