In this article we look at a sensor, the BMA220 Triple Axis Accelerometer from Bosch Sensortec, and connect it to an Arduino R4 Minima, you can use an older Arduino Uno. It will work just fine.
Sensor Information
The BMA220 Triple Axis Accelerometer by Bosch is an ultra small triaxial, low-g acceleration sensor breakboard with SPI and I2C interface, aiming for low power consumer market applications. It allows measurement of accelerations in 3 perpendicular axes and thus senses tilt, motion, shock and vibration in cell phones, handhelds, computer peripherals, man-machine interfaces, virtual reality features and game controllers.
The Tri-Axis Accelerometer integrates a multitude of features that acilitates its use especially in the area of motion detection applications, such as device orientation detection, gaming, HMI and menu browser control
It can be used in sensing tilt, motion and shock vibration in mobile devices, handhelds, digital peripherals, man-machine interfaces, virtual reality features and game consoles.
Specification
Power supply: 2.0-3.6V
Interface: I2C
Acceleration range:±2g/±4g/±8g/±16g
Ultra Low Power
LED power indication
Parts Required
You can connect to the sensor using DuPont-style jumper wire.
| Name | Link |
| Arduino R4 | Aliexpress link |
| BMA220 | Aliexpress link |
| Connecting cables | Male to Male + Male to Female and Female to Female Jumper Wire Dupont Cable |
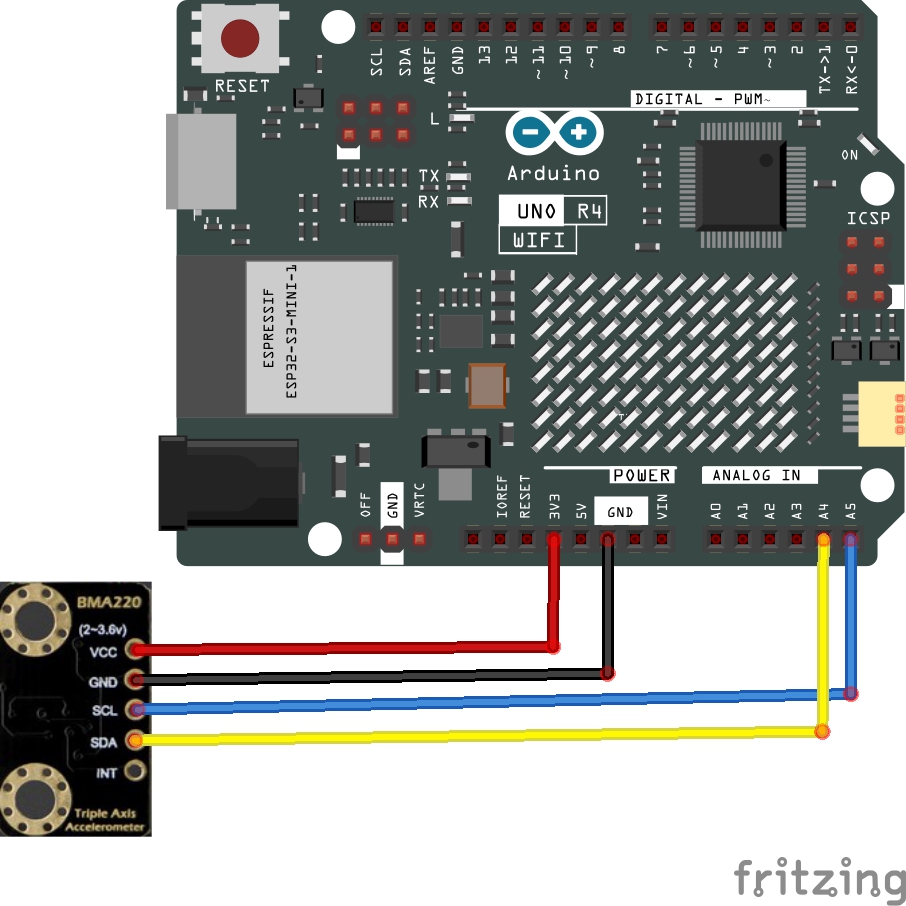
Schematic/Connection
I used 3.3v rather than 5v
Code Example
This requires no library
#include <Wire.h>

byte Version[3];
int8_t x_data;
int8_t y_data;
int8_t z_data;

void setup()
{
  Serial.begin(9600);
  Wire.begin();
  Wire.beginTransmission(0x0A); // address of the accelerometer
  // low pass filter, range settings
  Wire.write(0x20);
  Wire.write(0x05);
  Wire.endTransmission();

}

void AccelerometerInit()
{
   Wire.beginTransmission(0x0A); // address of the accelerometer
  // reset the accelerometer
  Wire.write(0x04); // Y data
  Wire.endTransmission();
  Wire.requestFrom(0x0A,1);    // request 6 bytes from slave device #2
  while(Wire.available())    // slave may send less than requested
  {
    Version[0] = Wire.read(); // receive a byte as characte
  }
  x_data=(int8_t)Version[0]>>2;

  Wire.beginTransmission(0x0A); // address of the accelerometer
  // reset the accelerometer
  Wire.write(0x06); // Y data
  Wire.endTransmission();
  Wire.requestFrom(0x0A,1);    // request 6 bytes from slave device #2
  while(Wire.available())    // slave may send less than requested
  {
    Version[1] = Wire.read(); // receive a byte as characte
  }
  y_data=(int8_t)Version[1]>>2;

  Wire.beginTransmission(0x0A); // address of the accelerometer
  // reset the accelerometer
  Wire.write(0x08); // Y data
  Wire.endTransmission();
  Wire.requestFrom(0x0A,1);    // request 6 bytes from slave device #2
   while(Wire.available())    // slave may send less than requested
  {
    Version[2] = Wire.read(); // receive a byte as characte
  }
   z_data=(int8_t)Version[2]>>2;

   Serial.print("X=");
   Serial.print(x_data);         // print the character
   Serial.print("  ");
   Serial.print("Y=");
   Serial.print(y_data);         // print the character
   Serial.print("  ");
   Serial.print("Z=");
   Serial.println(z_data);
}

void loop()
{
  AccelerometerInit();
 delay(100);

}
Output
When run you will see something like this in the serial monitor window,
X=-13 Y=-2 Z=9
X=-12 Y=-2 Z=9
X=-13 Y=-2 Z=10
X=-13 Y=-2 Z=9
X=-13 Y=-2 Z=9
X=-6 Y=-32 Z=-13
Links


