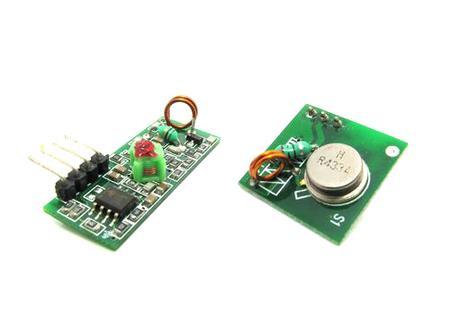
This is a simple example for an RF transmitter and reciever, these come in a couple of flavours the pair I had operate at 315Mhz.
These modules are readily available and look like this
Specs RF Receiver
1. Product Model: MX-05V
2. Operating voltage: DC5V
3. Quiescent Current: 4mA
4. Receiving frequency:315Mhz
5. Receiver sensitivity:-105DB
Specs RF Transmitter
1. Product Model: MX-FS-03V
2. Launch distance :20-200 meters
3. Operating voltage :3.5-12V
4. Operating mode: AM
5. Transfer rate: 4KB / S
6. Transmitting power: 10mW
7. Transmitting frequency: 315Mhz
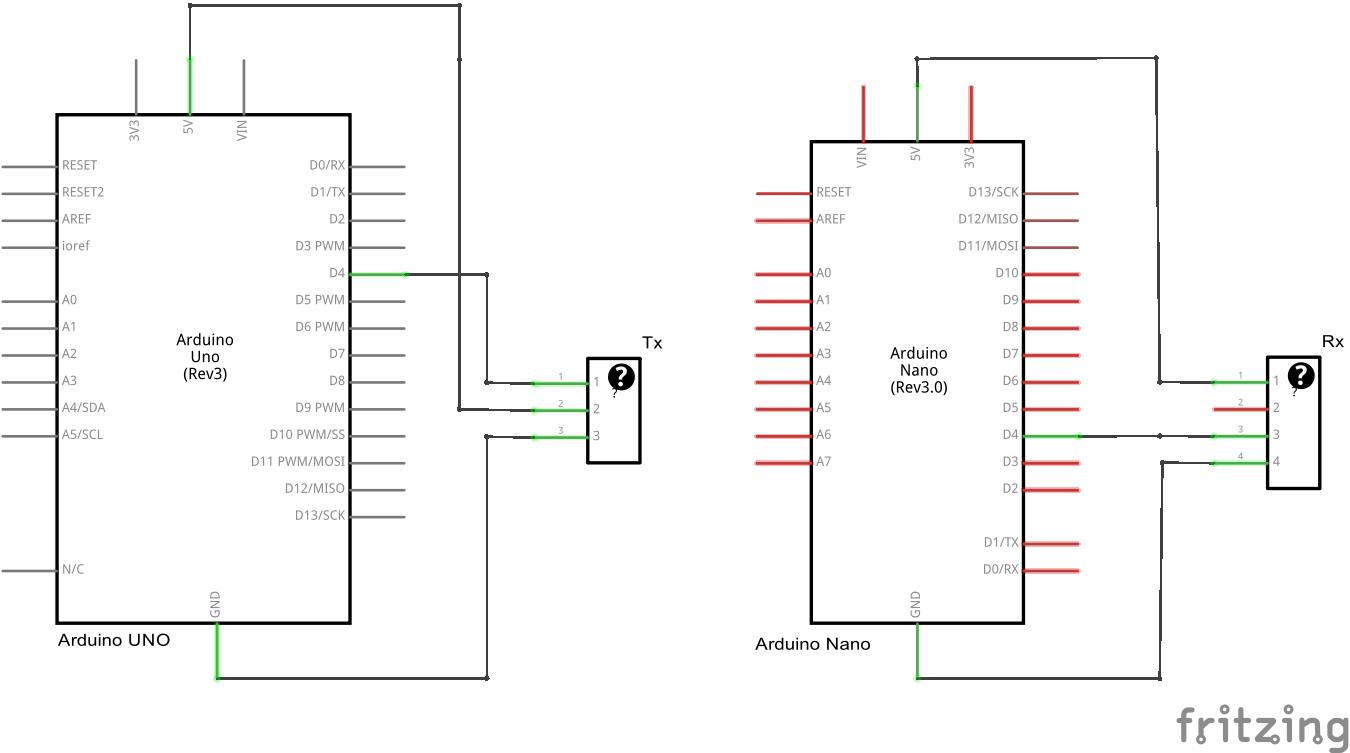
You will need an Arduino to be the transmitter and one to be the receiver. I used a Nano as transmitter and an Uno for receiver. This just made it easier to program the correct Arduino.
Schematic
Code
These need the VirtualWire library to be installed, get it from http://www.pjrc.com/teensy/td_libs_VirtualWire.html
Transmitter code
[codesyntax lang=”cpp”]
#include <VirtualWire.h>

int RF_TX_PIN = 4;

void setup()
{
  vw_set_tx_pin(RF_TX_PIN); // Setup transmit pin
  vw_setup(2000); // Transmission speed in bits per second.
}

void loop()
{
  const char *msg = "hello world";
  vw_send((uint8_t *)msg, strlen(msg));  // Send 'hello' every 400ms.
  delay(400);

}
[/codesyntax]
Receiver code
[codesyntax lang=”cpp”]
#include <VirtualWire.h>

int RF_RX_PIN = 4;

void setup()
{
  Serial.begin(9600);
  Serial.println("setup");
  vw_set_rx_pin(RF_RX_PIN);  // Setup receive pin.
  vw_setup(2000); // Transmission speed in bits per second.
  vw_rx_start(); // Start the PLL receiver.
}

void loop()
{
  uint8_t buf[VW_MAX_MESSAGE_LEN];
  uint8_t buflen = VW_MAX_MESSAGE_LEN;
  if(vw_get_message(buf, &buflen)) // non-blocking I/O
  {
    int i;
    // Message with a good checksum received, dump HEX
    Serial.print("Got: ");
    for(i = 0; i < buflen; ++i)
    {
      Serial.print(buf[i], HEX);
      Serial.print(" ");
    //Serial.print(buf[i]);
    }
    Serial.println("");
  }
}
[/codesyntax]


