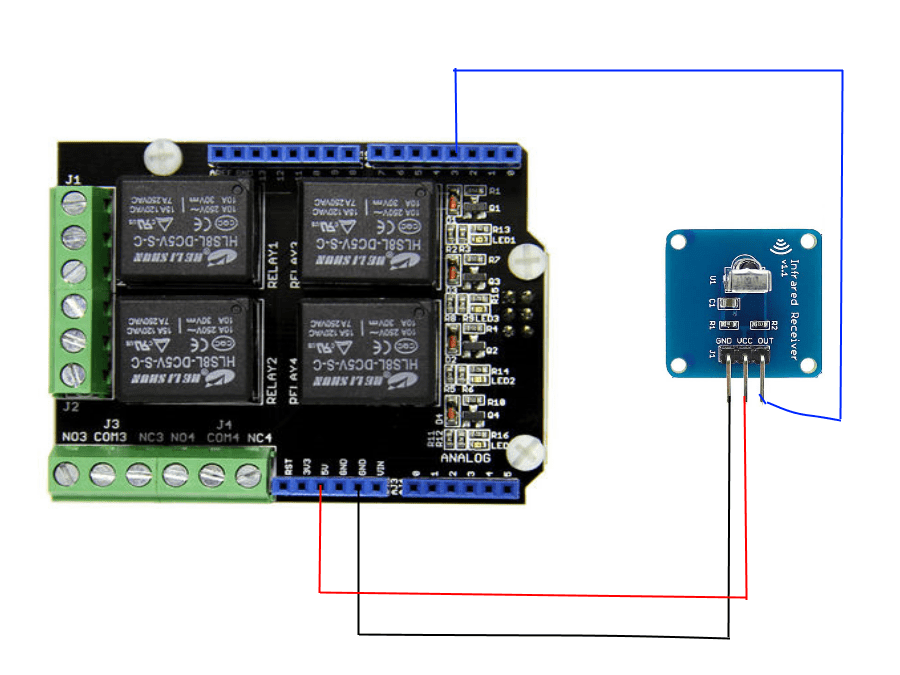
In this example we will connect a 4 channel relay shield to an Arduino Uno and control it via an infrared remote control. We will use keys 1 to 4 to control relay 1 to 4 and also use key 0 to switch off relays.
We will code this so that if you press the 1 key the Relay will be activated, if you then press the 1 key again the relay will be switched off.
Image
Here is a picture of what we created, the Infrared reciever was a module that I purchased, link at the bottom
Code
The code needs the IRremote remote library to be installed. Then you need to find the codes for the various buttons on the remote control
[codesyntax lang=”cpp”]
#include <IRremote.h>
int RECV_PIN = 3;
IRrecv irrecv(RECV_PIN);
decode_results results;
void setup()
{
Serial.begin(9600);
irrecv.enableIRIn(); // Start the receiver
}
void loop()
{
if (irrecv.decode(&results))
{
Serial.println(results.value, HEX);
irrecv.resume();
}
}
[/codesyntax]
Now upload the code above and open the serial monitor, when you press each button you should see the hex code for the keys you want to use, here is an example
0xFF30CF
0xFF18E7
Lets look at some of the code, remember that Relay 1 is pin 7 and so on
int RelayControl1 = 7;    // Digital Arduino Pin used to control the motor
int RelayControl2 = 6;
int RelayControl3 = 5;
int RelayControl4 = 4;

We then define some variables to hold the state of each relay, here is an example
boolean state1 = true;

The next piece of interesting piece of code is the handling of each button press, you can see we detect the hex code, if its match we then check the value of the state1
variable, if its true then the relay is switch on and the state is changed. This of course means that if the button is pressed again the value of the state
variable will be false and we switch the relay off, and set the state vartiable to true.
      case 0xFF30CF:
        Serial.println("1");
        if(state1==true)
        {
          digitalWrite(RelayControl1,HIGH);// NO1 and COM1 Connected (LED on)
          state1=false; //change the state
        }
        else
        {
          digitalWrite(RelayControl1,LOW);// NO1 and COM1 disconnected (LED off)
          state1=true; //change the state
        }
        break;


Here is t eh complete code example
[codesyntax lang=”cpp”]
#include <IRremote.h>

int RECV_PIN = 3;
int RelayControl1 = 7;    // Digital Arduino Pin used to control the motor
int RelayControl2 = 6;
int RelayControl3 = 5;
int RelayControl4 = 4;
boolean state1 = true;
boolean state2 = true;
boolean state3 = true;
boolean state4 = true;
IRrecv irrecv(RECV_PIN);
decode_results results;

void setup()
{
    Serial.begin(9600);
  pinMode(RelayControl1, OUTPUT);
  pinMode(RelayControl2, OUTPUT);
  pinMode(RelayControl3, OUTPUT);
  pinMode(RelayControl4, OUTPUT);
  irrecv.enableIRIn(); // Start the receiver
}


void loop()
{
  if (irrecv.decode(&results))
  {
    switch(results.value)
    {
      case 0xFF30CF:
        Serial.println("1");
        if(state1==true)
        {
          digitalWrite(RelayControl1,HIGH);// NO1 and COM1 Connected (LED on)
          state1=false; //change the state
        }
        else
        {
          digitalWrite(RelayControl1,LOW);// NO1 and COM1 disconnected (LED off)
          state1=true; //change the state
        }
        break;

      case 0xFF18E7:
        Serial.println("2");
        if(state2==true)
        {
          digitalWrite(RelayControl2,HIGH);// NO2 and COM2 Connected (LED on)
          state2=false;
        }
        else
        {
          digitalWrite(RelayControl2,LOW);// NO2 and COM2 disconnected (LED off)
          state2=true; //change the state
        }
        break;

      case 0xFF7A85:
        Serial.println("3");
        if(state3==true)
        {
          digitalWrite(RelayControl3,HIGH);// NO3 and COM3 Connected (LED on)
          state3=false;
        }
        else
        {
          digitalWrite(RelayControl3,LOW);// NO3 and COM3 disconnected (LED off)
          state3=true;
        }
        break;

      case 0xFF10EF:
        Serial.println("4");
        if(state4==true)
        {
          digitalWrite(RelayControl4,HIGH);// NO4 and COM4 Connected (LED on)
          state4=false;
        }
        else
        {
          digitalWrite(RelayControl4,LOW);// NO4 and COM4 disconnected (LED off)
          state4=true;
        }
        break;

      case 0xFF6897:
        Serial.println("OFF");
        digitalWrite(RelayControl1,LOW);
        digitalWrite(RelayControl2,LOW);
        digitalWrite(RelayControl3,LOW);
        digitalWrite(RelayControl4,LOW);
        state1 = true;
        state2 = true;
        state3 = true;
        state4 = true;
        break;

      default :
          Serial.println("Invalid Option");
        break;
    }
  delay(250);
  irrecv.resume();
  }
}
[/codesyntax]
Links
Expansion board 5V 4 – way relay module Relay Shield
KEYES Infrared receiver sensor module for arduino
