In this article we look at yet another humidity and temperature sensor from TI – this time its the HDC2080 which we will connect up to an Arduino Uno
Lets look at some of the technical information and data from TI
HDC2080 Information
The HDC2080 device is an integrated humidity and temperature sensor that provides high accuracy measurements with very low power consumption in a small DFN package. The capacitive-based sensor includes new integrated digital features and a heating element to dissipate condensation and moisture. The HDC2080 digital features include programmable interrupt thresholds to provide alerts and system wake-ups without requiring a microcontroller to be continuously monitoring the system. Combined with programmable sampling intervals, a low power consumption, and a support for a 1.8-V supply voltage, the HDC2080 is designed for battery-operated systems.
The HDC2080 provides high accuracy measurement capability for a wide range of environmental monitoring and Internet of Things (IoT) applications such as smart thermostats and smart home assistants. For designs where printed-circuit board (PCB) area is critical, a smaller CSP package option is available thru the HDC2010 with complete software compatibility with the HDC2080.
For applications with strict power-budget restrictions, Auto Measurement Mode enables the HDC2080 to automatically initiate temperature and humidity measurements. This feature allows users to configure a microcontroller into deep sleep mode because the HDC2080 is no longer dependent upon the microcontroller to initiate a measurement.
Programable temperature and humidity thresholds in the HDC2080 allow the device to send a hardware interrupt to wake up the microcontroller when necessary. In addition, the power consumption of the HDC2080 is significantly reduced, which helps to minimize self-heating and improve measurement accuracy.
The HDC2080 is factory-calibrated to 0.2°C temperature accuracy and 2% relative humidity accuracy.
Features
Relative humidity range: 0% to 100%
Humidity accuracy: ±2% (typical), ±3% (maximum)
Temperature accuracy: ±0.2°C (typical), ±0.4°C (maximum)
Sleep mode current: 50 nA (typical), 100 nA (maximum)
Average supply current (1 measurement/second)
300 nA: RH% only (11 bit)
550 nA: RH% (11 bit) + temperature (11 bit)
Temperature range:
Operating: –40°C to 85°C
Functional: –40°C to 125°C
Supply voltage range: 1.62 V to 3.6 V
Parts Required
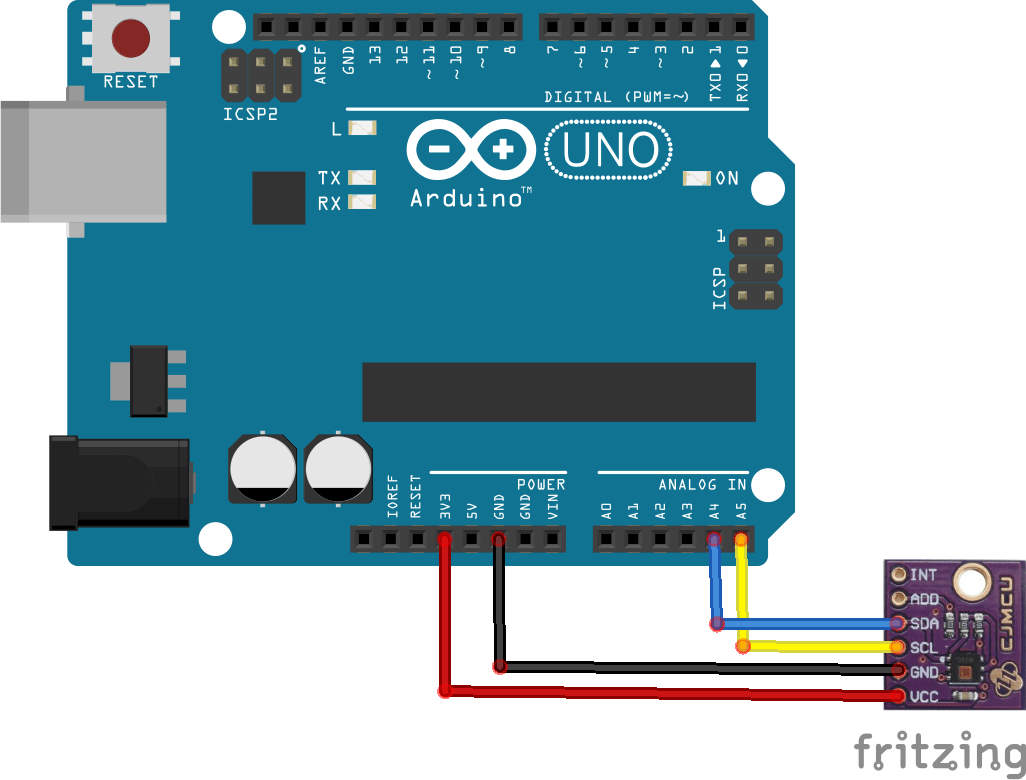
I connected a sensor shield to an Arduino and then the sensor via connecting wire
| Name | Link |
| Arduino Uno | UNO R3 CH340G/ATmega328P, compatible for Arduino UNO |
| HDC2080 | HDC2080 Temperature and Humidity Low Power Digital I2C Sensor |
| Connecting wire | Free shipping Dupont line 120pcs 20cm male to male + male to female and female to female jumper wire |
| sensor shield | Expansion IO Board Sensor Shield |
Schematic/Connection
This is a 3.3v rated sensor even though the pin says Vcc
Code Example
I used the library from https://github.com/tinkeringtech/HDC2080_breakout
This is the default example with a few cosmetic changes
[codesyntax lang=”cpp”]
#include <HDC2080.h>

#define ADDR 0x40
HDC2080 sensor(ADDR);

float temperature = 0, humidity = 0;

void setup() {

  Serial.begin(9600);
  Serial.println("TinkeringTech HDC2080 Test");

  // Initialize I2C communication
  sensor.begin();

  // Begin with a device reset
  sensor.reset();

  // Set up the comfort zone
  sensor.setHighTemp(48);         // High temperature of 28C
  sensor.setLowTemp(2);          // Low temperature of 22C
  sensor.setHighHumidity(95);     // High humidity of 55%
  sensor.setLowHumidity(10);      // Low humidity of 40%

  // Configure Measurements
  sensor.setMeasurementMode(TEMP_AND_HUMID);  // Set measurements to temperature and humidity
  sensor.setRate(ONE_HZ);                     // Set measurement frequency to 1 Hz
  sensor.setTempRes(FOURTEEN_BIT);
  sensor.setHumidRes(FOURTEEN_BIT);

  //begin measuring
  sensor.triggerMeasurement();
}

void loop() {

  Serial.print("Temperature (C): ");
  Serial.print(sensor.readTemp());
  Serial.print("\t\tHumidity (%): ");
  Serial.println(sensor.readHumidity());

  // Wait 1 second for the next reading
  delay(2000);

}
[/codesyntax]
Output
Open the serial monitor and you should see something like this
Temperature (C): 25.14 Humidity (%): 52.86
Temperature (C): 25.12 Humidity (%): 52.89
Temperature (C): 25.11 Humidity (%): 52.95
Temperature (C): 25.10 Humidity (%): 52.96
Temperature (C): 25.17 Humidity (%): 53.18
I do get some erratic readings at times, values like the following. I haven’t investigated this fully – I did try and increase and decrease the delay between readings with no luck.
Temperature (C): -40.00 Humidity (%): 0.00
Links
https://www.ti.com/lit/gpn/hdc2080
Summary
A nice little sensor but at just over $8 there are cheaper sensors available which have the same functionality, the library and code may need some work to work more reliably.


