In this article we look at a temperature sensor – this time its the BMP183 and we will connect it to our Arduino Uno
Lets look at some information regarding the sensor from the manufacturer
The BMP183 is the function compatible successor of the BMP085, a new generation of high precision digital pressure sensors for consumer applications. The ultra-low power, low voltage electronics of the BMP183is optimized for use in mobile phones, PDAs, GPS navigation devices and outdoor equipment. With a low altitude noise of merely 0.25m at fast conversion time, the BMP183 offers superior performance.
The SPI interface allows for easy system integration with a microcontroller. The BMP183is based on piezo-resistive technology for EMC robustness, high accuracy and linearity as well as long term stability.
Key features
Pressure range : 300 … 1100hPa (+9000m… -500m relating to sea level)
Supply voltage:
1.8 … 3.6V (VDD)
1.62V … 3.6V (VDDIO)
Low power : 5μA at 1 sample / sec. in standard mode
Low noise : 0.06hPa (0.5m)in ultra low power mode 0.02hPa (0.17m) ultra high resolution mode
Parts Required
Once again for ease of use I connect an sensor shield connected to my to Arduino Uno and then connect the sensor to that
| Name | Link |
| Arduino Uno | UNO R3 CH340G/ATmega328P, compatible for Arduino UNO |
| BMP183 | |
| Connecting wire | Free shipping Dupont line 120pcs 20cm male to male + male to female and female to female jumper wire |
| sensor shield | Expansion IO Board Sensor Shield |
Schematic/Connection
It is an SPI chip
SCK – This is the SPI Clock pin, its an input to the chip
SDO – this is the Serial Data Out / Master In Slave Out pin
SDI – this is the Serial Data In / Master Out Slave In pin
CS – this is the Chip Select pin
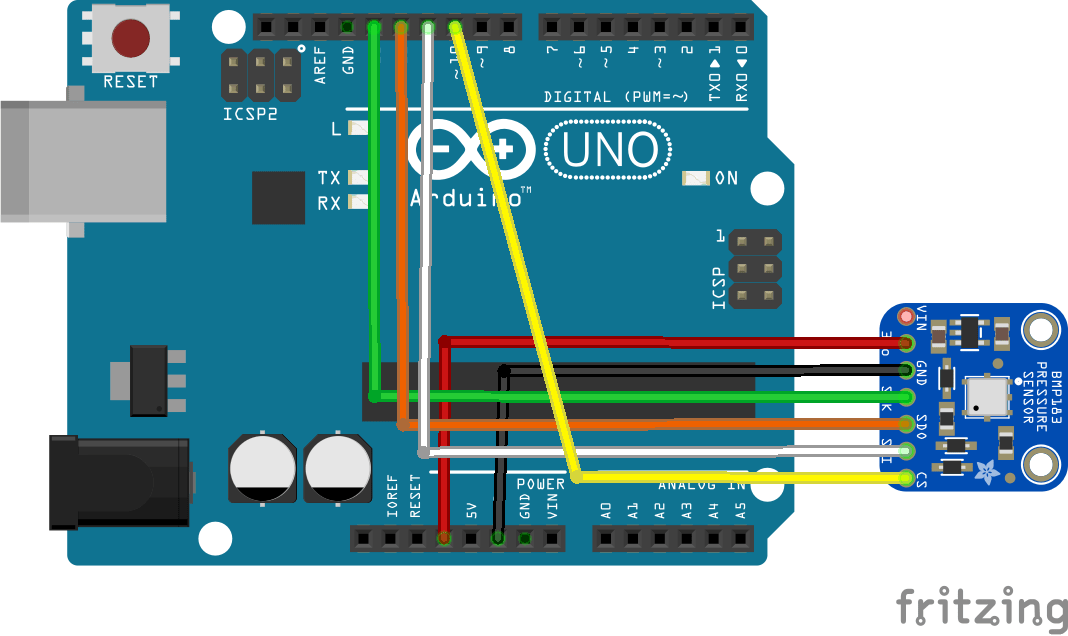
arduino and bmp183
Code Example
This uses the library from https://github.com/adafruit/Adafruit_BMP183_Library
[codesyntax lang=”cpp”]
#include <SPI.h>
#include <Adafruit_Sensor.h>
#include <Adafruit_BMP183.h>
// For hardware SPI:
// Connect SCK to SPI Clock, SDO to SPI MISO, and SDI to SPI MOSI
// See http://arduino.cc/en/Reference/SPI for your Arduino’s SPI pins!
// On UNO, Clock is #13, SDO/MISO is #12 and SDI/MOSI is #11
// You can also use software SPI and define your own pins!
#define BMP183_CLK 13
#define BMP183_SDO 12 // AKA MISO
#define BMP183_SDI 11 // AKA MOSI
// You’ll also need a chip-select pin, use any pin!
#define BMP183_CS 10
// initialize with hardware SPI
//Adafruit_BMP183 bmp = Adafruit_BMP183(BMP183_CS);
// or initialize with software SPI and use any 4 pins
Adafruit_BMP183 bmp = Adafruit_BMP183(BMP183_CLK, BMP183_SDO, BMP183_SDI, BMP183_CS);
/**************************************************************************/
/*
Arduino setup function (automatically called at startup)
*/
/**************************************************************************/
void setup(void)
{
Serial.begin(9600);
Serial.println(“BMP183 Pressure Sensor Test”); Serial.println(“”);
/* Initialise the sensor */
if(!bmp.begin())
{
/* There was a problem detecting the BMP183 … check your connections */
Serial.print(“Ooops, no BMP183 detected … Check your wiring!”);
while(1);
}
}
/**************************************************************************/
/*
Arduino loop function, called once ‘setup’ is complete (your own code
should go here)
*/
/**************************************************************************/
void loop(void)
{
/* Display atmospheric pressue in Pascals */
Serial.print(“Pressure: “);
Serial.print(bmp.getPressure());
Serial.print(” Pascals / “);
Serial.print(bmp.getPressure() / 100);
Serial.println(” millibar (hPa)”);
/* First we get the current temperature from the BMP085 */
float temperature;
temperature = bmp.getTemperature();
Serial.print(“Temperature: “);
Serial.print(temperature);
Serial.println(” C”);
/* Calculating altitude with reasonable accuracy requires pressure *
* sea level pressure for your position at the moment the data is *
* converted. If you don’t have these values, a ‘generic’ value of *
* 1013.25 mbar can be used (defined as SENSORS_PRESSURE_SEALEVELHPA *
* in sensors.h), but this isn’t ideal and will give variable *
* results from one day to the next. *
* *
* You can usually find the current SLP value by looking at weather *
* websites or from environmental information centers near any major *
* airport. *
* *
* For example, for Paris, France you can check the current mean *
* pressure and sea level at: http://bit.ly/16Au8ol */
/* Then convert the atmospheric pressure, SLP and temp to altitude */
/* Update this next line with the current SLP for better results */
float seaLevelPressure = SENSORS_PRESSURE_SEALEVELHPA; // should be ~1000
Serial.print(“Sea level pressure: “);
Serial.print(SENSORS_PRESSURE_SEALEVELHPA);
Serial.println(” millibar/hPa”);
Serial.print(“Altitude: “);
Serial.print(bmp.getAltitude(seaLevelPressure));
Serial.println(” m”);
Serial.println(“”);
delay(1000);
}
[/codesyntax]
Output
Open the serial monitor and you should see something like this
Pressure: 225814 Pascals / 1017 millibar (hPa)
Temperature: 23.21 C
Sea level pressure: 1013.25 millibar/hPa
Altitude: -7302.81 m
Pressure: 77513 Pascals / 1017 millibar (hPa)
Temperature: 22.87 C
Sea level pressure: 1013.25 millibar/hPa
Altitude: -38.89 m
Pressure: 101791 Pascals / 1017 millibar (hPa)
Temperature: 22.72 C
Sea level pressure: 1013.25 millibar/hPa
Altitude: -39.55 m
Links
