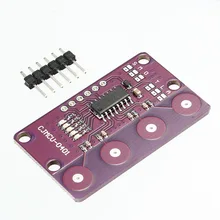
In this example we look at the CJMCU-0401, this is the module in question its a 4-bit Button Capacitive Touch Proximity Sensor With Self-locking Function
Description:
CJMCU-0401 is a touch IC designed with capacitive sensing principle.
Its stable sensing method can be applied to a variety of electronic products, the panel dielectric can be completely insulated material,
designed to replace the traditional mechanical structure switch or ordinary buttons.
Provides four touch inputs and four direct output pins and four LED indicators.
Features:
1. Operating voltage: 2.0V ~ 5.5V
2. The highest power consumption is 11.5uA, low power mode is only 4uA ( in 3V and no load)
3. External configuration pin is set to multiple modes
4. High reliability, the chip built-in debounce circuit, which can effectively prevent external noise interference caused by the malfunction
5. Can be used for glass, ceramics, plastics and other media surface
6. With automatic calibration function, when no keys are touched, the system recalibration cycle is about 4.0 Sec
The CJMCU-0401 uses a CT8224
Connection
| Arduino Uno | CJMCU-0401 module |
| 5v | Vcc |
| Gnd | Gnd |
| D4 | Out1 |
| D5 | Out2 |
| D6 | Out3 |
| D7 | Out4 |
Parts List
Here are the parts I used
Code
This example does not require any libraries
[codesyntax lang=”cpp”]
const int Pins[4] = {4, 5, 6, 7};

void setup()
{
  Serial.begin(9600);
  for (int i = 0; i < 4; i++)
  {
    pinMode(Pins[i], INPUT_PULLUP);
  }
}

void loop()
{
  boolean sensorVal = false;

  // Set sensorValue to 'true' if any pin reads HIGH
  for (int i = 0; i < 4 && sensorVal == false; i++)
  {
    sensorVal = digitalRead(Pins[i]);

    //print out the value of the pushbutton
    Serial.print("Pin ");
    Serial.print(Pins[i]);
    Serial.print(": ");
    Serial.println(sensorVal);
  }

  // Set the LED to opposite of 'sensorValue' (on unless at least one pin reads HIGH)
  delay(250);
}
[/codesyntax]
Output
Open the serial monitor – this is what you should expect to see
Pin 4: 0
Pin 5: 0
Pin 6: 0
Pin 7: 1
Pin 4: 0
Pin 5: 0
Pin 6: 0
Pin 7: 1
Pin 4: 0
Pin 5: 0
Pin 6: 0
Pin 7: 1
Pin 4: 0
Pin 5: 0
Pin 6: 1
Pin 4: 0
Pin 5: 1
Pin 4: 0
Pin 5: 1
Pin 4: 1
Pin 4: 1
Pin 4: 1
Pin 4: 1
Pin 4: 1
Pin 4: 1
Pin 4: 1
Pin 4: 0
Pin 5: 0
Pin 6: 0
Pin 7: 0
